apiVersion:argoproj.io/v1alpha1kind:Workflow #new type of k8s specmetadata:generateName:hello-world- #name of workflow specspec:entrypoint:whalesay #invoke the whalesay templatetemplates:- name:whalesay #name of templatecontainer:image:docker/whalesaycommand:[cowsay]args:["hello world"]resources:#don't use too much resourceslimits:memory:32Micpu:100m
생성후 kubernetes에 submit 한다.
1
$ argo submit hello-world.yaml
현재 워크플로우 list를 보려면 list 명령어를 이용한다.
1
2
3
4
5
$ argo list
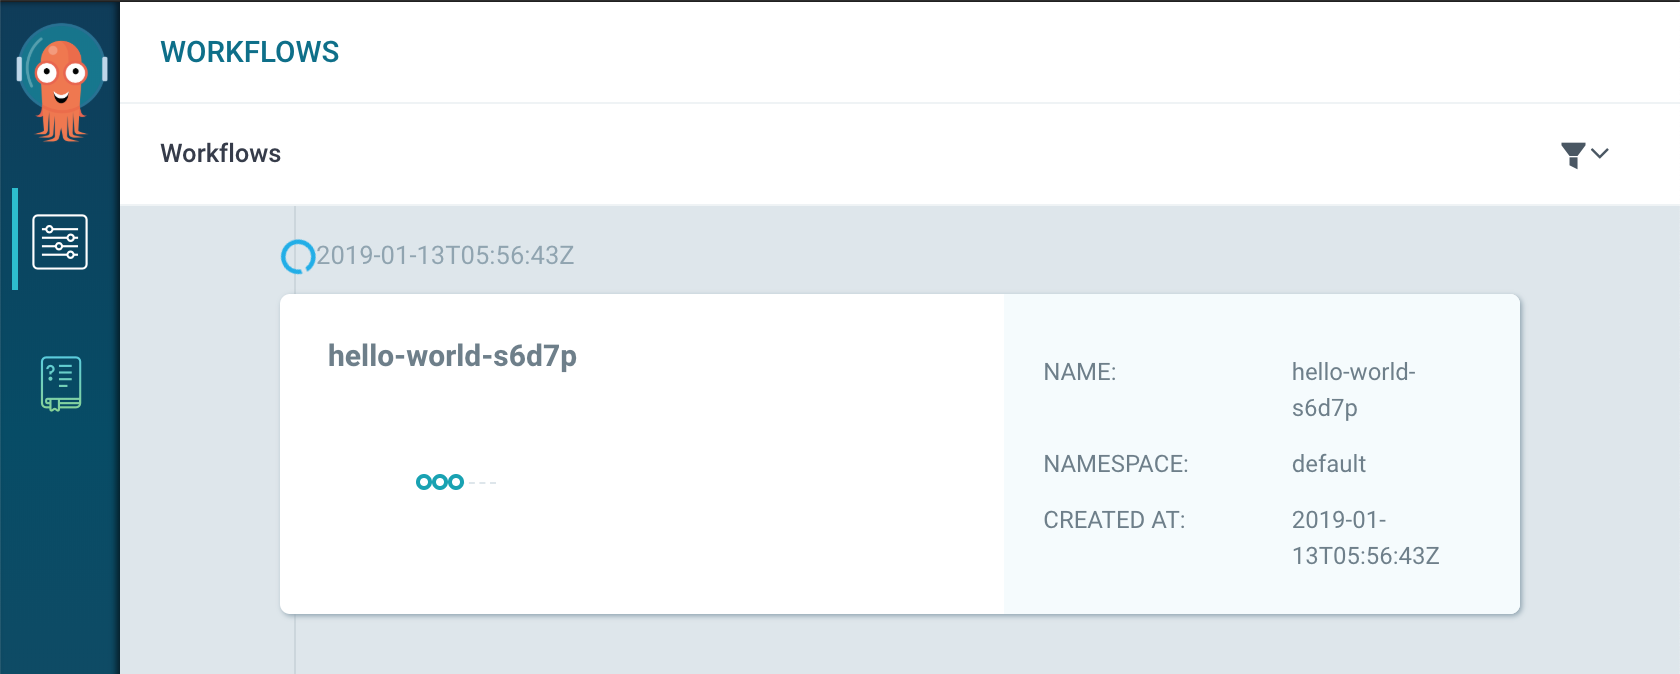
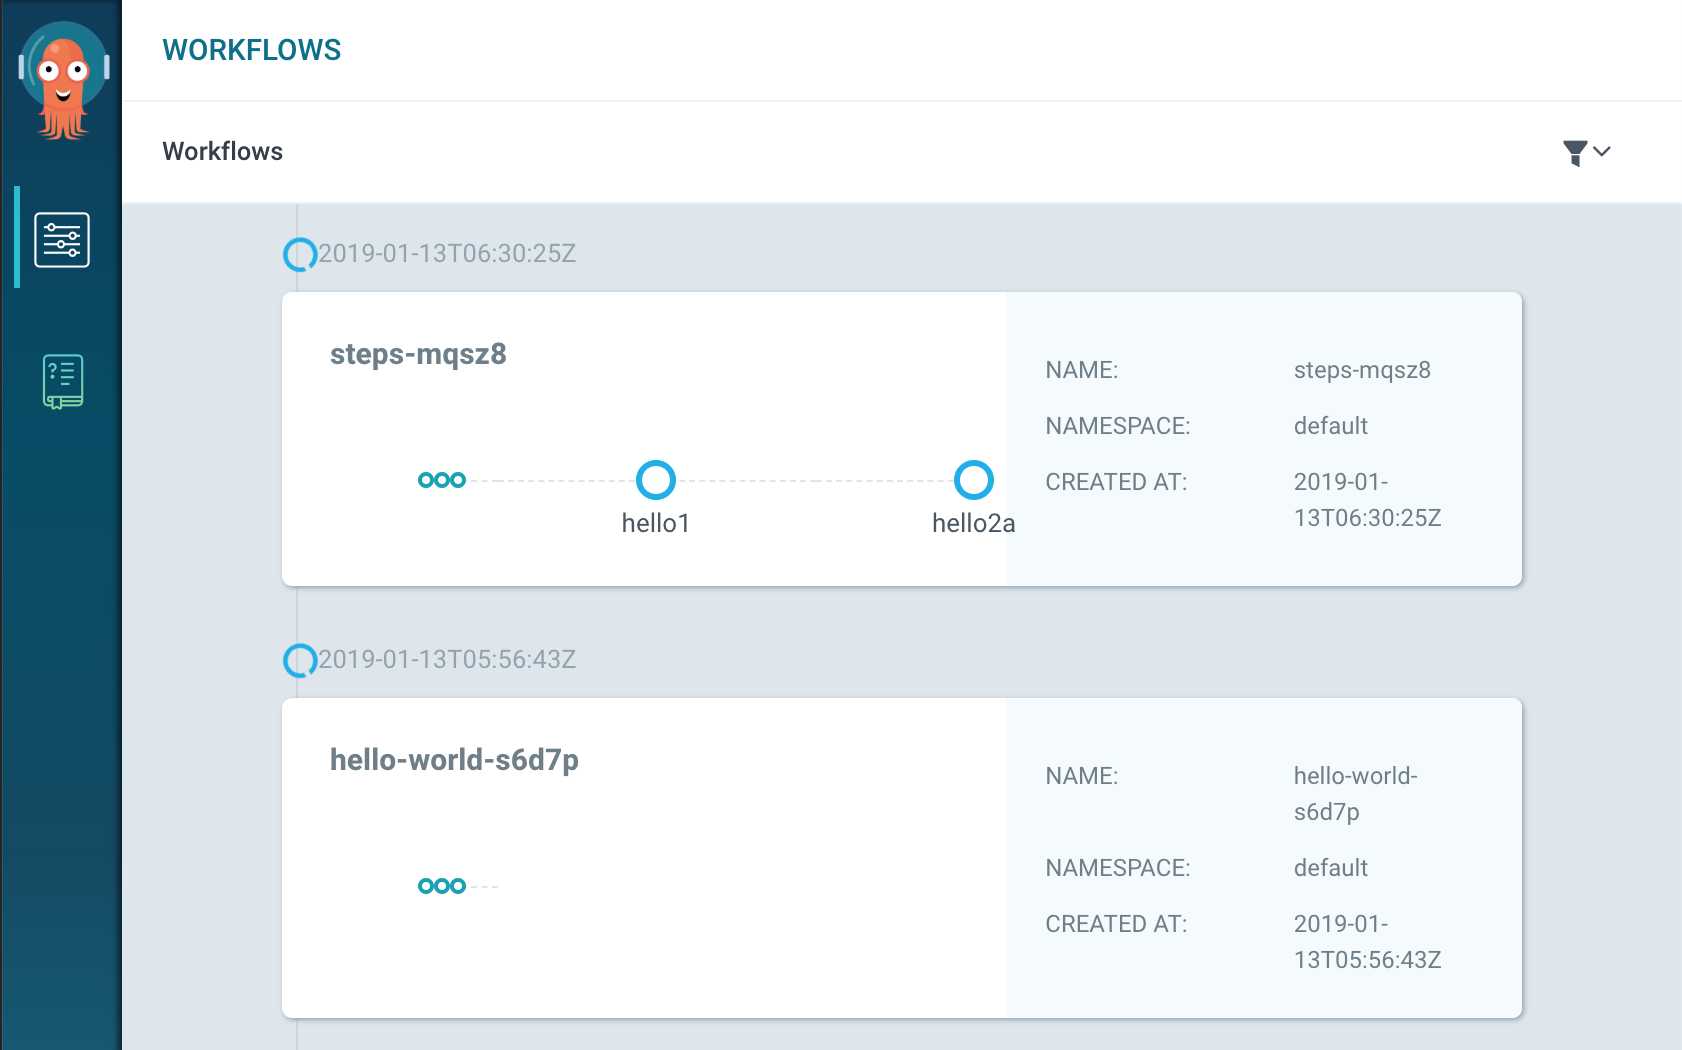
NAME STATUS AGE DURATION
hello-world-s6d7p Running 10m 10m
생성된 pod 의 상태를보려면 get 명령어를 이용
1
2
3
4
5
6
7
8
9
10
11
12
13
$ argo get hello-world-s6d7p
Name: hello-world-s6d7p
Namespace: default
ServiceAccount: default
Status: Running
Created: Sun Jan 13 14:56:43 +0900 (11 minutes ago)Started: Sun Jan 13 14:56:52 +0900 (10 minutes ago)Duration: 10 minutes 52 seconds
STEP PODNAME DURATION MESSAGE
● hello-world-s6d7p hello-world-s6d7p 10m
apiVersion:argoproj.io/v1alpha1kind:Workflowmetadata:generateName:steps-spec:entrypoint:hello-hello-hello# This spec contains two templates: hello-hello-hello and whalesaytemplates:- name:hello-hello-hello# Instead of just running a container# This template has a sequence of stepssteps:- - name:hello1 #hello1 is run before the following stepstemplate:whalesayarguments:parameters:- name:messagevalue:"hello1"- - name:hello2a #double dash => run after previous steptemplate:whalesayarguments:parameters:- name:messagevalue:"hello2a"- name:hello2b #single dash => run in parallel with previous steptemplate:whalesayarguments:parameters:- name:messagevalue:"hello2b"# This is the same template as from the previous example- name:whalesayinputs:parameters:- name:messagecontainer:image:docker/whalesaycommand:[cowsay]args:["{{inputs.parameters.message}}"]
Metadata에서 generateName: steps- 는 워크플로우 이름이다.
워크플로우는 templates부분에 정의 되어있는데 hello1과 hello2a를 보면 앞에 - - 2개의 -가 정의되어있고 hello2b 같은경우는 1개의 -로 되어있는 것을 볼 수 있다. 이는 hello2a, hello2b를 동시에 실행하는 것을 의미한다.
다시 실행해보자.
 1
 2
 3
 4
 5
 6
 7
 8
 9
10
11
12
13
14
15
16
17
$ argo submit --watch helloworld-multi.yaml
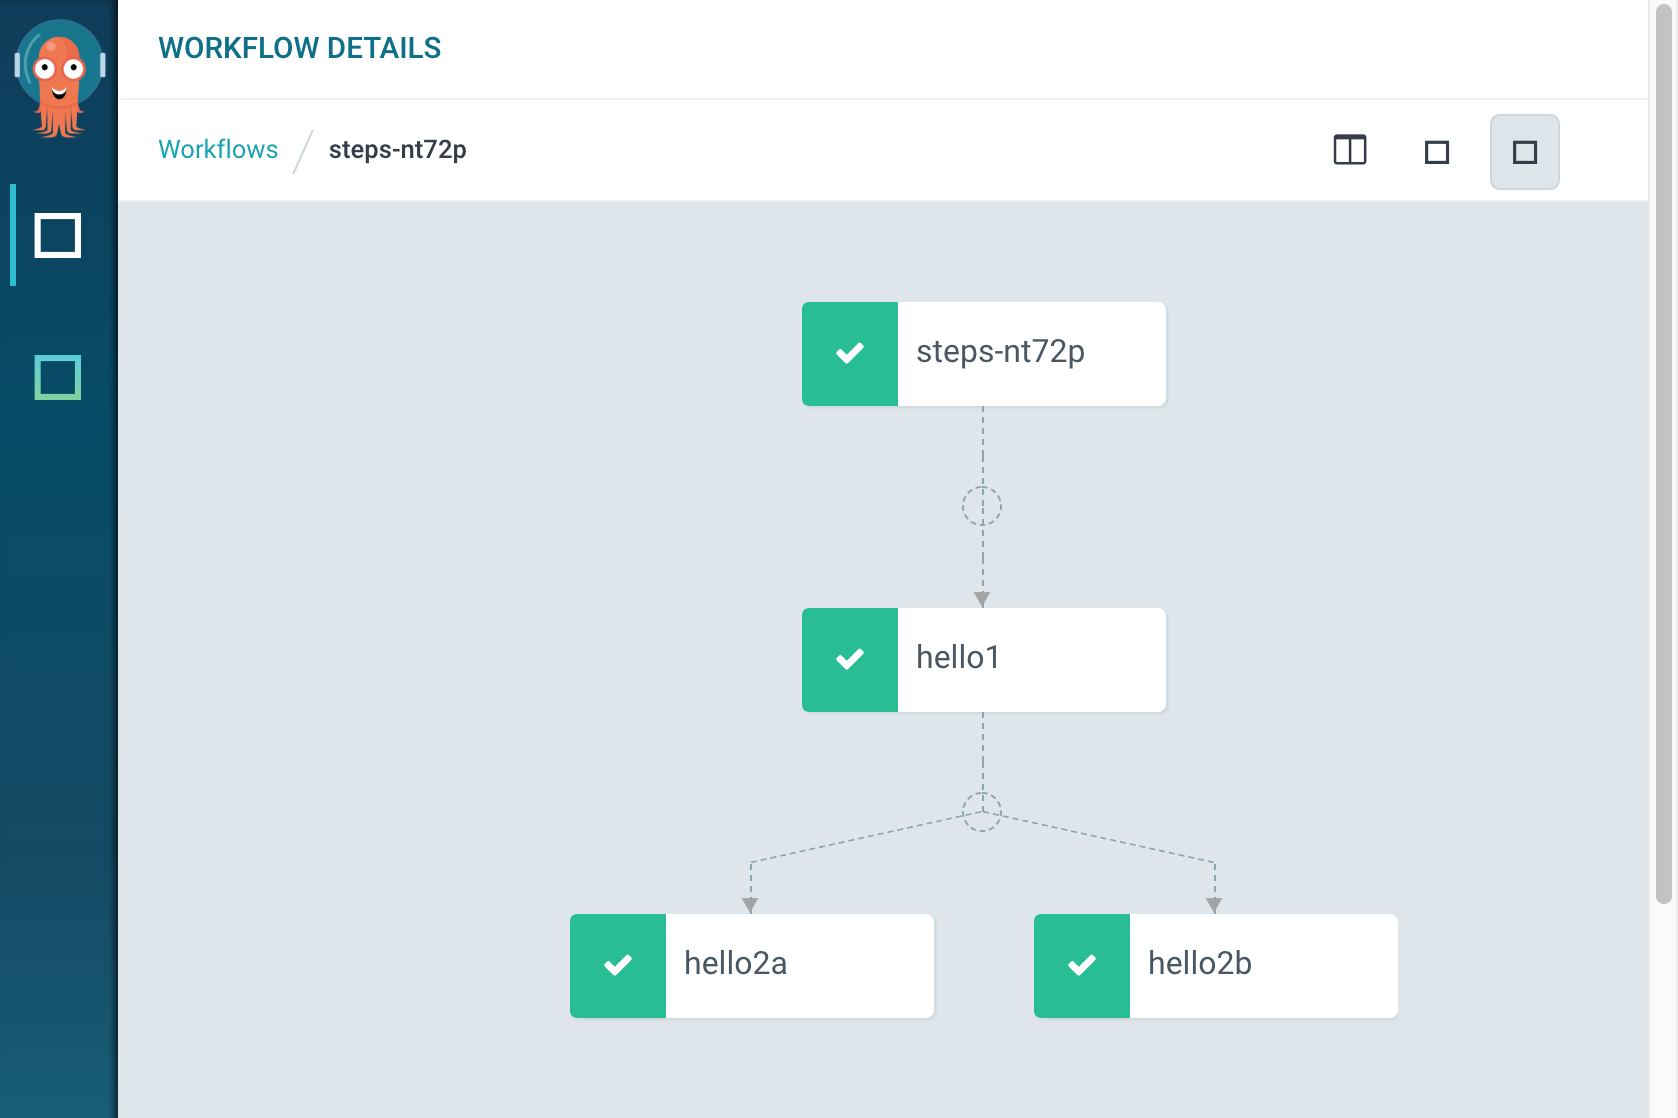
Name: steps-nt72p
Namespace: argo
ServiceAccount: default
Status: Succeeded
Created: Sun Jan 13 15:39:55 +0900 (5 seconds ago)Started: Sun Jan 13 15:39:55 +0900 (5 seconds ago)Finished: Sun Jan 13 15:40:00 +0900 (now)Duration: 5 seconds
STEP PODNAME DURATION MESSAGE
✔ steps-nt72p
├---✔ hello1 steps-nt72p-1112559031 1s
└-·-✔ hello2a steps-nt72p-220736832 1s
└-✔ hello2b steps-nt72p-271069689 2s
--watch 옵션은 각 단계별 실행 상태와 워크플로우 구조를 볼 수 있다.
argo
step-~ 이라는 워크플로우가 생성되었다.
Warning Notice: istio가 설치되어있는환경에서는 계속 running에서 대기중이던데 확인이 필요할 거 같다. istio가 적용안되어있는 namespace를 이용했더니 잘 작동했다.
apiVersion:argoproj.io/v1alpha1kind:Workflowmetadata:generateName:hello-world-parameters-spec:# invoke the whalesay template with# "hello world" as the argument# to the message parameterentrypoint:whalesayarguments:parameters:- name:messagevalue:hello worldtemplates:- name:whalesayinputs:parameters:- name:message #parameter declarationcontainer:# run cowsay with that message input parameter as argsimage:docker/whalesaycommand:[cowsay]args:["{{inputs.parameters.message}}"]
먼저 spec.arguments 부분에서 message라는 변수를 선언 하였고, 그값은 hello world로 되어 있다. 그리고 워크플로우의 whalesay 태스크에서 message 변수를 input 변수로 사용하도록 선언했다. input.parameters.message를 참조하여 message 변수의 값을 도커 컨테이터의 실행 변수로 넘기도록 하였다.
apiVersion:argoproj.io/v1alpha1kind:Workflowmetadata:generateName:output-parameter-spec:entrypoint:output-parametertemplates:- name:output-parametersteps:- - name:generate-parametertemplate:whalesay- - name:consume-parametertemplate:print-messagearguments:parameters:# Pass the hello-param output from the generate-parameter step as the message input to print-message- name:messagevalue:"{{steps.generate-parameter.outputs.parameters.hello-param}}"- name:whalesaycontainer:image:docker/whalesay:latestcommand:[sh, -c]args:["echo -n hello world > /tmp/hello_world.txt"]#generate the content of hello_world.txtoutputs:parameters:- name:hello-param #name of output parametervalueFrom:path:/tmp/hello_world.txt #set the value of hello-param to the contents of this hello-world.txt- name:print-messageinputs:parameters:- name:messagecontainer:image:docker/whalesay:latestcommand:[cowsay]args:["{{inputs.parameters.message}}"]
먼저 whalesay를 보면 outputs.parameters에 hello-param이라는 이름으로 output 변수를 정의하였고, output 내용은 /tmp/hello_world.txt 파일 내용으로 채워진다.
다음 print-message 컨테이너 정의 부분을 보면 input param으로 message라는 변수를 정의하였다. steps를 보면 print-message를 실행할때 message 변수의 값을
{{steps.generate-parameter.outputs.parameters.hello-param}} 로 정의해 print-message의 이전 스탭인 generate-parameter의 output param 중에 hello-param이라는 변수의 값으로 채우는 것을 볼 수 있다.
Artifact
워크 플로우 태스크에 대한 입/출력값을 parameter로 전달할 수 도 있지만, CI/CD 빌드 파이프라인에서는 소스코드, 빌드 바이너리가 될수 도 있고 빅데이터 파일일 수도 있다. 이 경우 parameter를 이용해서 넘기기는 부담이 된다.
이런경우 artifact라는 기능을 이용한다. 외부 저장소 AWS S3나 GCP GCS같은 곳에 저장할 수 있게하고 반대로 읽기도 가능하다.
나중에 kubeflow에서 텐서플로우 학습을 시키는 파이프라인이 있을때 학습된 모델을 S3나 GCS에 저장하도록 하는 작업을 할 수 있다.
apiVersion:argoproj.io/v1alpha1kind:Workflowmetadata:generateName:artifact-passing-spec:entrypoint:artifact-exampletemplates:- name:artifact-examplesteps:- - name:generate-artifacttemplate:whalesay- - name:consume-artifacttemplate:print-messagearguments:artifacts:# bind message to the hello-art artifact# generated by the generate-artifact step- name:messagefrom:"{{steps.generate-artifact.outputs.artifacts.hello-art}}"- name:whalesaycontainer:image:docker/whalesay:latestcommand:[sh, -c]args:["cowsay hello world | tee /tmp/hello_world.txt"]outputs:artifacts:# generate hello-art artifact from /tmp/hello_world.txt# artifacts can be directories as well as files- name:hello-artpath:/tmp/hello_world.txt- name:print-messageinputs:artifacts:# unpack the message input artifact# and put it at /tmp/message- name:messagepath:/tmp/messagecontainer:image:alpine:latestcommand:[sh, -c]args:["cat /tmp/message"]